Battery switch on travel trailer function is crucial for managing your RV’s power. Understanding how this system works is key to preventing dead batteries and ensuring a smooth camping experience. This guide will walk you through the different types of switches, how to use them safely, troubleshoot common problems, and even upgrade your system for better power management. We’ll cover everything from basic operation to advanced techniques, making sure you’re confident in handling your travel trailer’s electrical system.
We’ll explore the various types of battery switches available, their wiring diagrams, and the step-by-step process of operating them correctly. We’ll also delve into troubleshooting common issues, offering practical solutions and preventative measures to keep your battery system running smoothly. Proper battery management is key to extending the life of your batteries and avoiding costly repairs, so we’ll cover best practices for maintaining your system and maximizing its efficiency.
Understanding Battery Switch Functionality in Travel Trailers

Keeping your travel trailer’s batteries charged and ready to power your appliances is crucial for a comfortable camping experience. A battery switch is the key component that controls the flow of power from your batteries to your trailer’s electrical system. Understanding how it works is essential for maintaining your RV’s power and preventing potential problems.
Types of Battery Switches Used in Travel Trailers
Travel trailers typically utilize one of three main types of battery switches: a simple on/off switch, a dual-battery switch, and a battery isolator. A simple on/off switch is the most basic, allowing you to disconnect the house battery completely. A dual-battery switch allows you to select between your house battery, your starting battery (for your tow vehicle), or both.
Battery isolators, often combined with a charging system, automatically manage the charging and switching between batteries.
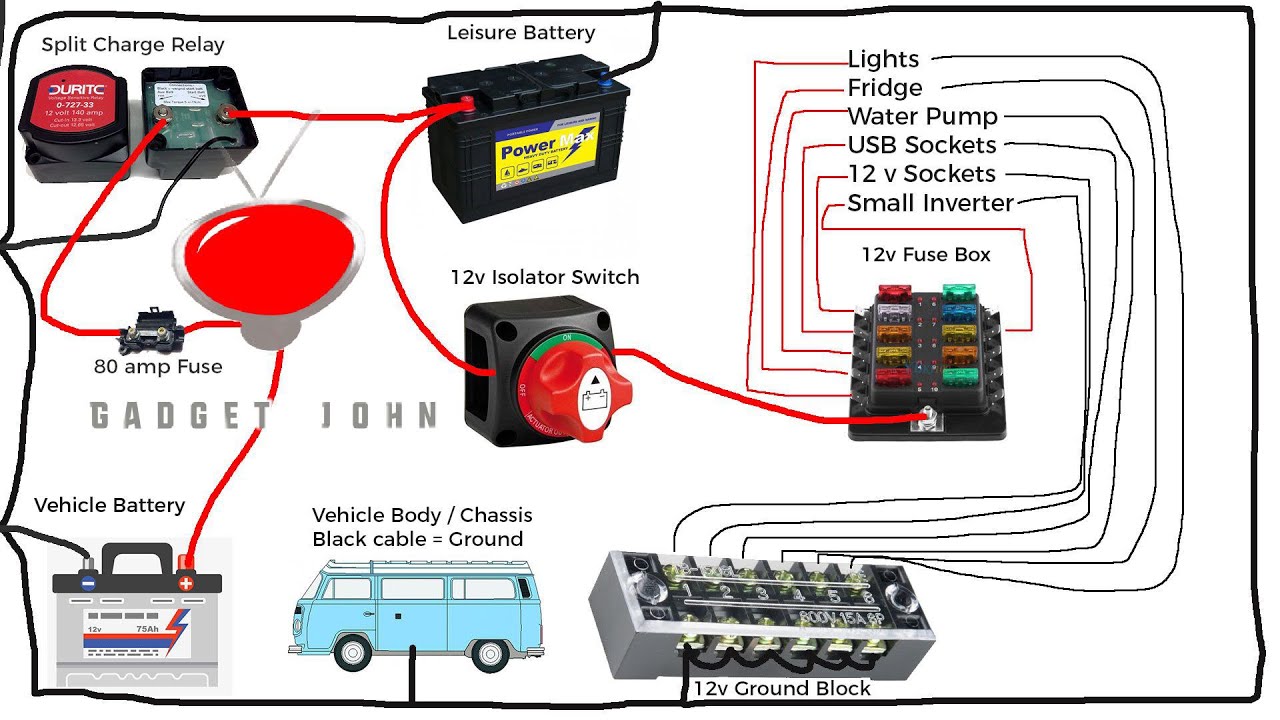
Typical Wiring Diagram of a Battery Switch System
A typical dual-battery switch system involves two batteries (house and starting), a battery switch, and wiring connecting the batteries to the switch and then to the trailer’s electrical system. The switch acts as a selector, directing power from either the house battery, the starting battery, or both to the trailer’s 12-volt system. A common setup includes a positive (+) cable from each battery connected to the switch, and a single positive cable running from the switch to the trailer’s distribution panel.
Negative (-) cables typically run directly from each battery to the chassis ground.
Proper Operation of a Battery Switch
Operating a battery switch is straightforward. For a simple on/off switch, you simply move the lever to the “on” position to connect the battery to the trailer’s system and “off” to disconnect it. For a dual-battery switch, you select the desired battery source (house, starting, or both) using the switch’s positions. Always ensure the switch is in the correct position before connecting or disconnecting your trailer from the tow vehicle.
Incorrect switching can lead to drained batteries or damage to the electrical system.
Advantages and Disadvantages of Different Battery Switch Types
Each type of battery switch offers unique advantages and disadvantages:
| Switch Type | Advantages | Disadvantages |
|---|---|---|
| Simple On/Off | Simple, inexpensive, easy to install. | Only allows for one battery to be used at a time; no battery selection. |
| Dual Battery Switch | Allows selection between house and starting batteries or both; increased run time. | Slightly more complex than a simple switch; still requires manual switching. |
| Battery Isolator | Automatic charging and switching; prevents battery drain; protects sensitive electronics. | More expensive and complex to install; may require professional installation. |
Power Flow Through a Typical Battery Switch
The following flowchart illustrates the power flow in a typical dual-battery switch system:
Imagine a simple box representing the battery switch with three output points. One output is labeled “House,” one “Starting,” and one “Both.” Each output is connected to the relevant portion of the trailer’s electrical system. From the left side of the box, two inputs are connected: one labeled “House Battery” and the other “Starting Battery”. The switch acts as a gate.
When the switch is set to “House,” only power from the “House Battery” flows to the “House” output. When set to “Starting,” only power from the “Starting Battery” flows to the “Starting” output. When set to “Both,” power from both batteries flows to the “Both” output. This simplified model illustrates the core functionality.
Troubleshooting Common Battery Switch Issues
Your travel trailer’s battery switch is a crucial component, connecting your house batteries to shore power or your tow vehicle’s charging system. Problems with this switch can leave you without power when you need it most. Understanding common issues and how to troubleshoot them is essential for maintaining your RV’s electrical system.
Common Battery Switch Problems and Their Causes
Malfunctioning battery switches can manifest in several ways. The most common problems include the switch failing to connect to the house battery, the switch not turning on at all, or experiencing intermittent power. These issues often stem from corroded connections, faulty wiring, a broken switch mechanism, or even a blown fuse. Environmental factors, such as exposure to moisture and extreme temperatures, can also contribute to these problems.
Troubleshooting a Battery Switch That Won’t Connect to the House Battery
If your house battery isn’t receiving power even when the switch is in the correct position, several steps can help pinpoint the problem. First, visually inspect all connections for corrosion or looseness. Clean any corroded terminals with a wire brush and apply a corrosion inhibitor. Next, check the fuses associated with the battery switch. A blown fuse will prevent power from reaching the house battery.
If the fuses are intact, use a multimeter to test the continuity of the wiring between the switch and the battery. A lack of continuity indicates a break in the wiring that needs repair. Finally, if all other checks are clear, the battery switch itself might be faulty and require replacement.
Testing a Battery Switch for Continuity
Using a multimeter to test your battery switch for continuity is a straightforward process. First, turn off the battery switch and disconnect the wires from the switch. Set your multimeter to the continuity setting (usually indicated by a diode symbol). Touch one multimeter lead to each terminal of the battery switch. If the switch is working correctly, the multimeter should beep, indicating continuity.
If there’s no beep, the switch is faulty and needs replacement. Remember to always disconnect the battery before performing any electrical tests.
Troubleshooting a Battery Switch That Won’t Turn On
A battery switch that refuses to turn might indicate a problem with the switch mechanism itself, or a problem with the power supply to the switch. First, check the circuit breaker or fuse protecting the switch. A tripped breaker or blown fuse will prevent the switch from functioning. If these are fine, carefully inspect the switch for any physical damage or obstructions preventing it from turning.
So, you’re planning a trip? Awesome! First things first: get yourself sorted with travel insurance. Check out Aon travel insurance for solid coverage. Then, if you’re an audiophile like me, don’t forget your tunes! Setting up an amazing audiophile travel setup is key for enjoying those long journeys. Make sure to pack headphones and a good portable DAC for the best sound quality on the go.
Happy travels!
If the switch still won’t operate, it’s likely a faulty internal component and will require replacement.
Battery Switch Problem Diagnosis Table
| Symptom | Likely Cause | Troubleshooting Steps | Potential Solutions |
|---|---|---|---|
| No power to house battery | Loose or corroded connections, blown fuse, faulty switch, broken wiring | Inspect connections, check fuses, test wiring continuity with multimeter, test switch continuity | Clean/tighten connections, replace fuse, replace switch, repair/replace wiring |
| Intermittent power to house battery | Loose connections, corroded connections, failing switch | Inspect connections, check for corrosion, test switch continuity under load | Clean/tighten connections, replace switch |
| Switch won’t turn | Tripped breaker, blown fuse, mechanical failure in switch | Check circuit breaker/fuse, inspect switch for physical damage | Reset breaker/replace fuse, replace switch |
| Switch makes clicking noise but no power | Faulty switch, insufficient battery power | Test switch continuity, check battery voltage | Replace switch, charge or replace battery |
Battery Switch and Power Management
Proper battery management is absolutely crucial for extending the lifespan of your travel trailer’s batteries and ensuring you have power when you need it. Neglecting your batteries can lead to premature failure, leaving you stranded without lights, refrigeration, or other essential systems. Understanding how your battery switch works is key to effective power management.The battery switch acts as a central control point, allowing you to isolate and manage different battery banks (like your house batteries and your starting battery for your tow vehicle if connected).
This control prevents unwanted drain from one battery bank to another, significantly improving power efficiency. By strategically switching between batteries and external power sources, you can maximize the life of your batteries and avoid costly replacements.
Battery System Maintenance Best Practices
Regular maintenance is vital for keeping your travel trailer’s battery system in top condition. Consistent upkeep will save you from unexpected breakdowns and costly repairs down the road.
- Regular Cleaning: Keep battery terminals clean and free of corrosion. Corrosion buildup can impede current flow, reducing performance and potentially causing damage. Use a wire brush and baking soda solution to clean terminals thoroughly.
- Water Level Checks (for flooded lead-acid batteries): If you have flooded lead-acid batteries, regularly check the water level in each cell and add distilled water as needed. Low water levels can damage the plates and shorten battery life.
- Periodic Testing: Use a multimeter to test the voltage of your batteries periodically. This allows you to monitor their state of charge and identify any potential problems early on. A fully charged 12-volt battery should read around 12.6 to 13.2 volts.
- Proper Storage: When storing your travel trailer for extended periods, disconnect the batteries to prevent parasitic drain. Consider using a battery maintainer to keep them topped off, especially during colder months.
- Ventilation: Ensure adequate ventilation around your batteries to prevent the buildup of explosive gases. Batteries should be in a well-ventilated area.
Situations Requiring Battery Switch Usage
The battery switch plays a critical role in preventing unwanted battery drain in various scenarios. Understanding these scenarios can help you avoid unexpected power outages.
- Preventing Deep Discharge: If you’re using significant power from your house batteries (e.g., running an air conditioner or microwave), switching to external power (shore power) prevents deep discharging your batteries, extending their lifespan.
- Protecting the Starting Battery: When your travel trailer is connected to shore power, switching to the “off” position prevents accidental drain on your vehicle’s starting battery through the battery switch.
- Isolating Faulty Batteries: If one battery bank experiences a problem (e.g., a shorted cell), the battery switch allows you to isolate that bank, preventing it from affecting the other batteries or draining your entire system.
- Conserving Battery Power: When boondocking (off-grid camping), using the battery switch to selectively power essential appliances extends the time you can operate without external power sources.
Connecting and Disconnecting External Power Sources
Connecting and disconnecting external power sources (like shore power at a campground) using the battery switch is a straightforward process, but it’s important to follow the correct steps to prevent electrical damage.
- Connecting Shore Power: First, connect your shore power cord to your travel trailer and then turn on the shore power breaker at the pedestal. Next, turn the battery switch to the “on” position to allow power from the shore power to charge the batteries and power the trailer’s systems.
- Disconnecting Shore Power: Before disconnecting your shore power cord, turn the battery switch to the “off” position to isolate the batteries. This prevents any backfeed from the trailer’s systems to the shore power connection, which could damage the electrical system. Then, disconnect the shore power cord from both the trailer and the pedestal.
Safety Considerations with Battery Switches: Battery Switch On Travel Trailer Function
Working with your travel trailer’s battery system requires caution. Batteries contain corrosive acid and store significant electrical energy, posing risks if handled improperly. Understanding and following safety procedures is crucial to prevent accidents and injuries. This section details essential safety precautions and preventative measures for working with your battery switch.
Incorrect operation of your battery switch can lead to several hazards. A common mistake is accidentally connecting the house batteries to the vehicle’s electrical system while the engine is running, potentially overloading the system and causing damage to components. Conversely, leaving the switch in the wrong position can drain your house batteries, leaving you without power when you need it most.
More seriously, improper handling can lead to short circuits, sparks, and potentially even fires or severe electrical shocks.
Preventing Electrical Shocks and Short Circuits
To minimize the risk of electrical shock, always disconnect the negative (-) battery cable before working on any part of the battery system. This breaks the circuit, preventing the flow of electricity. When reconnecting, attach the negative cable last. Always wear appropriate safety gear, including insulated gloves and safety glasses, to protect yourself from accidental contact with electrical components or corrosive battery acid.
Keep the area around the battery clean and dry to prevent short circuits. Avoid wearing loose clothing or jewelry that could accidentally contact exposed terminals. Before working on the system, ensure the battery switch is in the “OFF” position to completely isolate the batteries.
Travel Trailer Battery System Safety Checklist
Regular inspection and maintenance are key to a safe and reliable battery system. This checklist Artikels important steps to ensure your system remains safe and functional.
So, you’re planning a trip? Awesome! First things first: get yourself sorted with travel insurance. Check out Aon travel insurance for comprehensive coverage. Then, if you’re an audiophile like me, don’t forget your tunes! Planning your audiophile travel setup beforehand is key to enjoying your favorite music on the go. A little prep work goes a long way for a smooth and enjoyable trip!
- Visual Inspection: Check for corrosion on battery terminals, loose connections, and any signs of damage to the battery box or wiring.
- Cable Condition: Examine battery cables for fraying, cracking, or any other signs of wear and tear. Replace damaged cables immediately.
- Terminal Cleaning: Clean battery terminals with a wire brush and baking soda solution to remove corrosion. Apply a corrosion inhibitor to protect terminals.
- Switch Functionality: Test the battery switch to ensure it operates correctly and smoothly. Verify that the switch positions accurately reflect the battery connections.
- Secure Connections: Check that all battery connections are tight and secure. Loose connections can lead to overheating and potential fires.
- Ventilation: Ensure adequate ventilation around the batteries to prevent the buildup of flammable hydrogen gas.
- Proper Storage: When not in use for extended periods, disconnect the batteries to prevent drainage and potential damage.
Potential Dangers of Battery Switch Misuse
Misuse of the battery switch can lead to several serious consequences. Understanding these risks helps promote safe and responsible operation.
- Electrical Shocks: Improper handling of battery terminals or working on the system while it’s energized can result in dangerous electrical shocks.
- Short Circuits: Loose connections, corrosion, or accidental contact between terminals can cause short circuits, potentially leading to fires.
- Battery Damage: Incorrect switch operation can overcharge or discharge batteries, reducing their lifespan and potentially causing damage.
- System Damage: Overloading the electrical system due to improper switch operation can damage sensitive electronic components in your travel trailer.
- Fire Hazards: Sparks from short circuits or overheating batteries can ignite flammable materials, leading to a fire.
- Acid Burns: Contact with battery acid can cause serious chemical burns to skin and eyes.
Battery Switch Upgrades and Alternatives
Upgrading your travel trailer’s battery switch can significantly improve power management and reliability. This section explores various switch types, alternative power systems, and the installation process. Choosing the right system depends on your power needs and technical skills.
Types of Battery Switches, Battery switch on travel trailer function
Several battery switch types are available, each with its own set of advantages and disadvantages. These include simple single-pole, double-pole, and more sophisticated electronic switches offering features like remote control and monitoring capabilities.
Advantages and Disadvantages of Upgrading
Upgrading to a more advanced battery switch offers several benefits. For example, a switch with a digital display provides real-time monitoring of battery voltage and state of charge, aiding in preventative maintenance and avoiding unexpected power failures. However, upgrades can be costly and may require more complex installation. Simple switches are less expensive and easy to install, but lack advanced features.
Alternative Power Management Systems
Beyond battery switches, several alternative power management systems exist for travel trailers. These include solar panel systems, generator systems, and battery management systems (BMS) that regulate charging and discharging. A BMS often works in conjunction with a battery switch, providing more precise control over power distribution. For example, a sophisticated BMS might prioritize charging the house battery from solar before the engine battery.
A generator, meanwhile, can provide a supplemental power source for longer trips or situations where solar isn’t sufficient.
Installing a New Battery Switch
Installing a new battery switch requires basic electrical knowledge and adherence to safety precautions. Always disconnect the battery’s negative terminal before working on any electrical components. The process involves removing the old switch, carefully matching the wiring to the new switch’s terminals (refer to the switch’s wiring diagram), and securely mounting the new switch. Failure to properly wire the switch can lead to electrical shorts or damage to your RV’s electrical system.
Consult a qualified electrician if you are unsure about any aspect of the installation. Remember to use appropriately sized wiring and connectors for the amperage your system requires.
Battery Switch Comparison
| Model Name | Features | Price Range | Pros & Cons |
|---|---|---|---|
| Blue Sea Systems 7625 | Dual battery switch, 200 amp continuous, LED indicators | $50-$80 | Pros: Reliable, simple operation; Cons: No remote control or monitoring |
| AGS Automatic Switching System | Automatic switching between batteries, prioritizes charging, prevents over-discharge | $150-$300 | Pros: Automated, protects batteries; Cons: More complex installation, higher cost |
| Victron Energy Battery Monitor | Monitors battery voltage, current, and state of charge, remote monitoring capabilities | $100-$200 | Pros: Precise monitoring, data logging; Cons: Requires additional sensors, more complex setup |
| Sterling Power R100 | Dual battery isolator, prevents battery drain, high amperage capacity | $100-$150 | Pros: Simple operation, high current handling; Cons: No remote monitoring, basic functionality |
Mastering your travel trailer’s battery switch is essential for safe and efficient power management. By understanding its function, troubleshooting potential problems, and following safety guidelines, you’ll ensure a worry-free camping experience. Remember, regular maintenance and preventative measures will prolong the life of your battery system and prevent costly repairs. So, get out there and enjoy the open road, knowing you’ve got your power under control!
FAQ Insights
What happens if I accidentally leave my battery switch in the “off” position?
Leaving the switch off will disconnect your house batteries from the trailer’s electrical system. You’ll lose power to appliances and lights, and your batteries won’t charge from the alternator or shore power.
How often should I check my battery switch?
Regularly inspect your battery switch for corrosion, loose connections, and proper operation. A good practice is to check it before and after each trip.
Can I use a battery switch with lithium batteries?
Some battery switches are compatible with lithium batteries, but others are not. Always check the manufacturer’s specifications to ensure compatibility. Using an incompatible switch can damage your lithium batteries.
My battery switch is making a clicking noise. What’s wrong?
A clicking noise often indicates a weak or dead battery, a loose connection, or a problem with the switch itself. Check your battery voltage and connections before inspecting the switch for internal damage.
